Collaborate ULTRA is an online classroom, with built in features for engaging with students. These include interactive whiteboards, access to shared files, and options to use breakout rooms for students to work together.
Collaborate sessions can be set up individually for specific activities, with a start and finish time for the session. Alternatively, Collaborate sessions can be set up to run for the duration of a Moodle course, offering an option for an ongoing course room or space for hosting tutorial sessions.
Collaborate sessions can also be recorded and saved within Moodle for students to access and review previous sessions.
Adding Collaborate to a Moodle course page
To add a Collaborate ULTRA session to your Moodle:
- In Edit mode, click Add Activity or resource on your Moodle page
- Select Collaborate ULTRA

Next, you’ll need to fill in the details for the Collaborate session:
- Add a title and optional description
- Set the date and time of classroom start
- Select the duration of the Collaborate session: between 1 hour and the full duration of the Moodle course.
- Choose whether to allow guest access to your Collaborate classroom. If allowing guest access, select what role guests are given.
Guest Access
Guest links are publicly accessible links to your Collaborate session. This means anyone with the link can join your session.
Joining a Collaborate session
To join a Collaborate session, open the Moodle Collaborate activity, then select Join Session.
You will be signed in to the Collaborate session automatically.

Joining as a guest
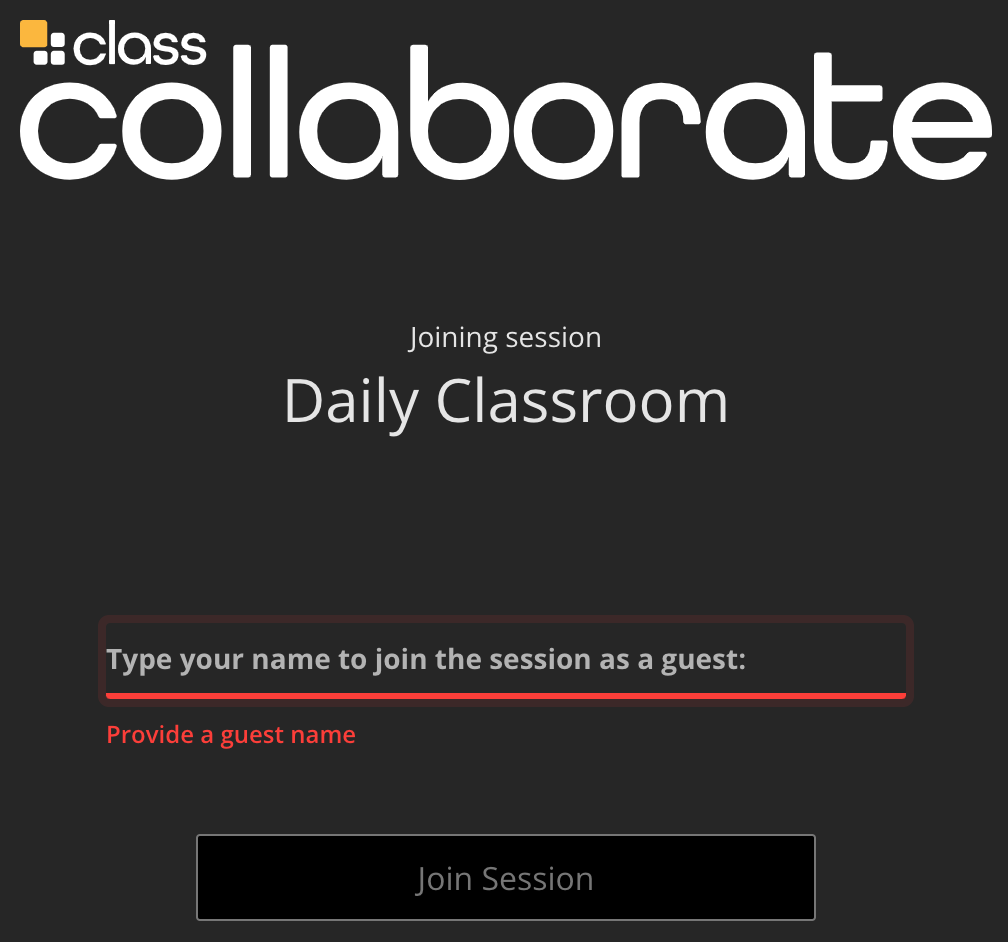
Collaborate sessions can be joined by guests without accessing through Moodle. To provide guest access you’ll need to share the guest link. Open the Guest links tab in your Moodle Collaborate activity to find the relevant link.
- Options for guest access can be found in the Moodle Collaborate ULTRA activity settings.

To enter a Collaborate session as a guest:
- Copy the guest link
- Paste the link into your web browser
- Enter your name at the joining page
- Click Join Session
Teaching with Collaborate
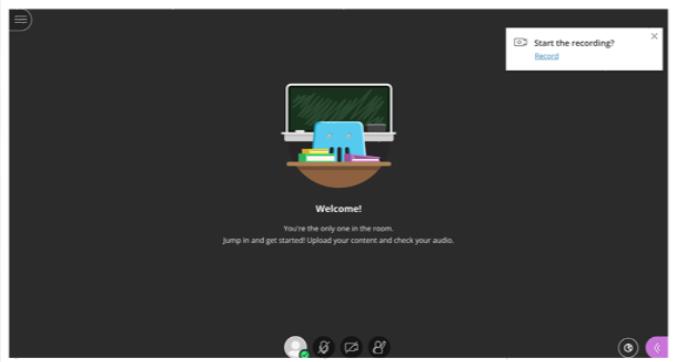
The Collaborate session will open in a new browser window. You’ll see any participants who are already in the session, or be notified if you are the only one present.
Inside Collaborate
To get started with a Collaborate session, you may need to configure your browser to allow Collaborate to access your camera and microphone. The requests will normally come as a pop-up window (in Google Chrome for example).
Next, you’ll need to enable your microphone and camera. This can be done using the buttons at the bottom of the Collaborate screen.

Additional audio and video settings can be accessed in My Settings using the Collaborate Panel on the right-hand side of the Collaborate classroom.
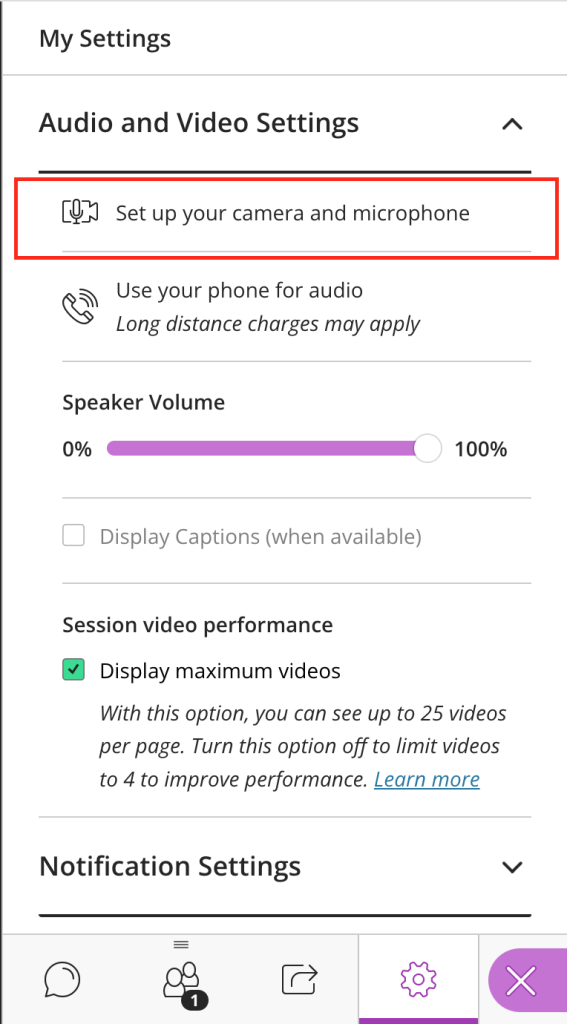
Here you can use the configuration options to test your camera and microphone.
- Click Set up your camera and microphone
- First complete the Audio test. Select your microphone input, and check if the audio bar moves when speaking. Click the button Yes. Audio is working. to move on.
- Next, complete the Video test. Select your camera input, check if the image from your camera is appearing on the screen. Click Yes. Video is working. to complete the set up.
Setting up the session
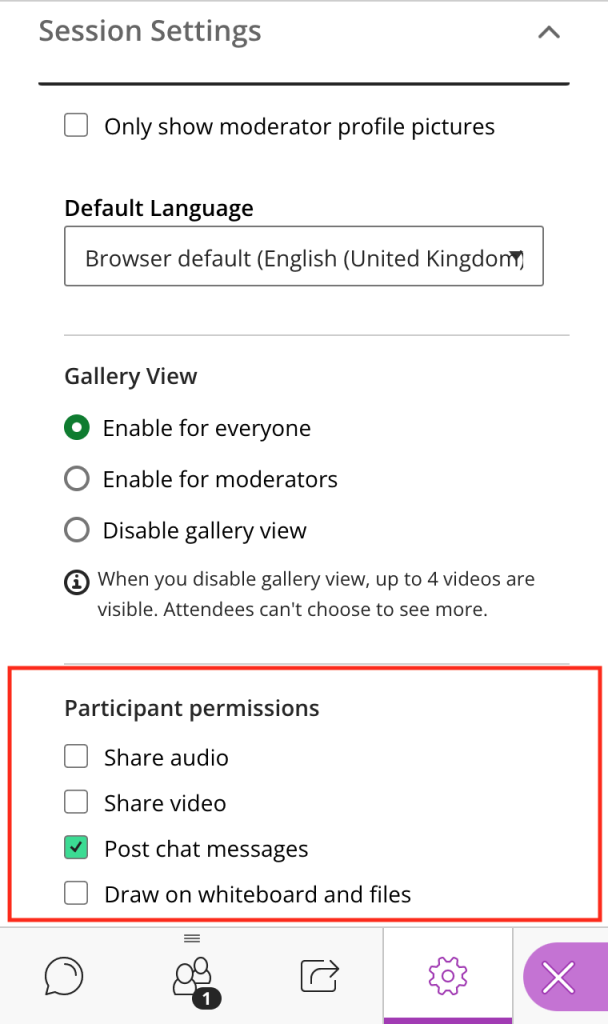
You can also change permission settings for your Collaborate session in the My Settings menu. Here you can choose how participants are able to engage with a session: giving permission for accessing video, audio and chat functions. To make changes:
- Open the Collaborate Panel
- Select My Settings tab
- Open Session settings menu
- Scroll down to Participant permsissions
- Select the relevant permissions for your session
Delivering a session
Collaborate has a number of options for sharing content within your session. To get started:
- Click the Collaborate Panel menu button
- Then select Share Content.
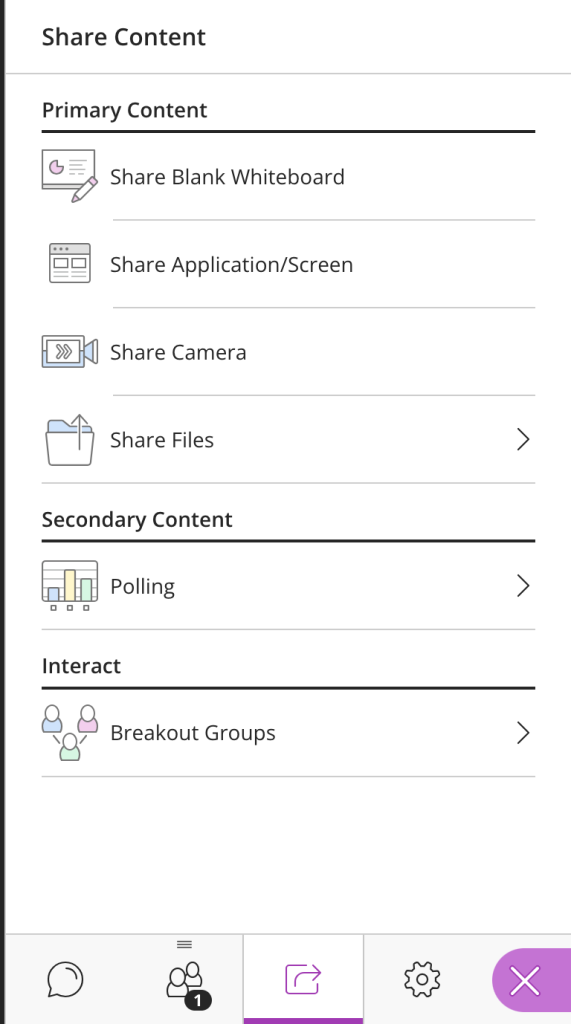
- To share content from your own device, you can choose to Share Application/Screen.
- Content can also be uploaded directly to Collaborate using the option Share files. Files such as PDFs, PowerPoint presentations and images can be uploaded. These can be shown to participants during the Collaborate session, they are also made available for participants to download during or after the session. Files can be uploaded in advance of the session for ease of use.
Working with students
To allow students to actively engage in your Collaborate session you’ll need to make sure Participant permissions are set up. Sharing audio, video, chat messages and whiteboard access can all be toggled on or off using the My Settings menu.
Using Polls
- Open the Collaborate Panel
- Select the Share Content tab
- Select Polling from the menu
- Select the type of poll you’d like to create: Multiple choice or Yes/No
- Enter your question and possible responses
- Select Start
- You can lock the poll using the Lock Poll option
- To finish the poll click the stop button in the top right
Using the Whiteboard
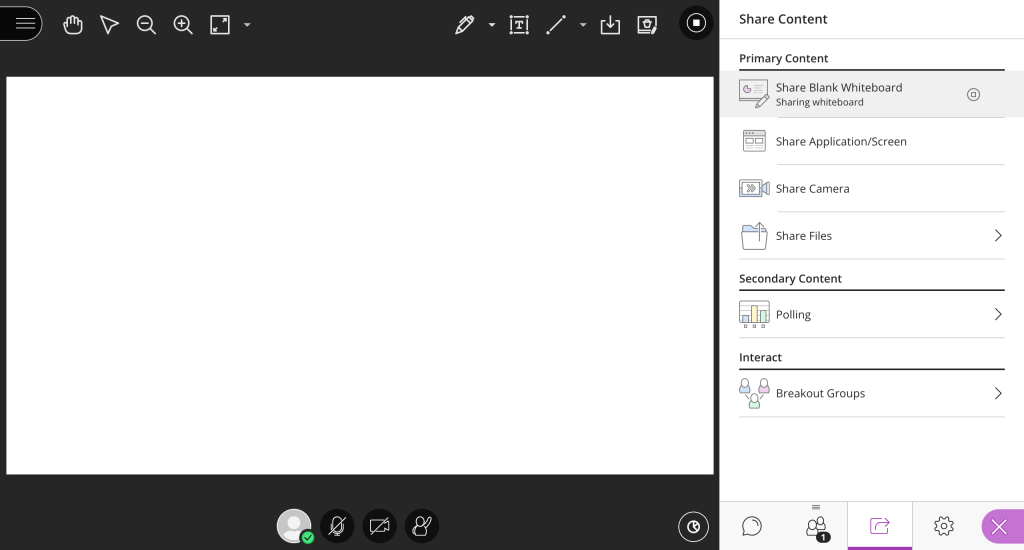
- Open the Collaborate Panel
- Select the Share Content tab
- Select Share blank whiteboard, this will replace your session screen with an interactive whiteboard slide
- If permissions have been set up, students will be able to work directly on the whiteboard slide. This can be downloaded as a pdf file using the download option at the top of the whiteboard.
Interacting with shared files
- Open the Collaborate Panel
- Select the Share Content tab
- Click Share Files
- Use the Add files button to begin uploading content
- Note: this can be done prior to the session beginning to save time
- To share a file, select the file in the menu, then click Share now. This will display the file to participants in the session. The file can then be annotated by participants. To save the file use the download button in the annotation tools at the top of the screen.

Using Breakout Groups
- Open the Collaborate Panel
- Select the Share Content tab
- Click Breakout Groups
- Groups can be renamed, added or deleted as necessary
- Organise students into their relevant groups. Once groups are configured, click Start to begin the breakout rooms
- When the breakout session has begun, moderators can move between breakout rooms using the breakout groups menu
- Attendees can be searched for using the Additional options button in the top right of the breakout groups menu
- Pausing breakout groups will temporarily return all participants to the main room
- To finish the session click End
- Please note ending breakout groups will remove any whiteboard or file activities within the breakout rooms.

Recording and accessibility
When entering a Collaborate session as a Moderator, Collaborate will ask if you’d like to record the session if recording isn’t already taking place.

You can also choose to record the session at any time using the Session Menu. Select Start Recording to get started.

When the session has finished, open the Session Menu and select Stop Recording.
Please note that breakout rooms will not be recorded. If all participants are moved into breakout rooms, the session will pause recording too. Use the Session Menu to restart.
Your session recording will be stored in the Moodle Collaborate ULTRA activity. To access the recording simply open the activity in Moodle and follow the link.
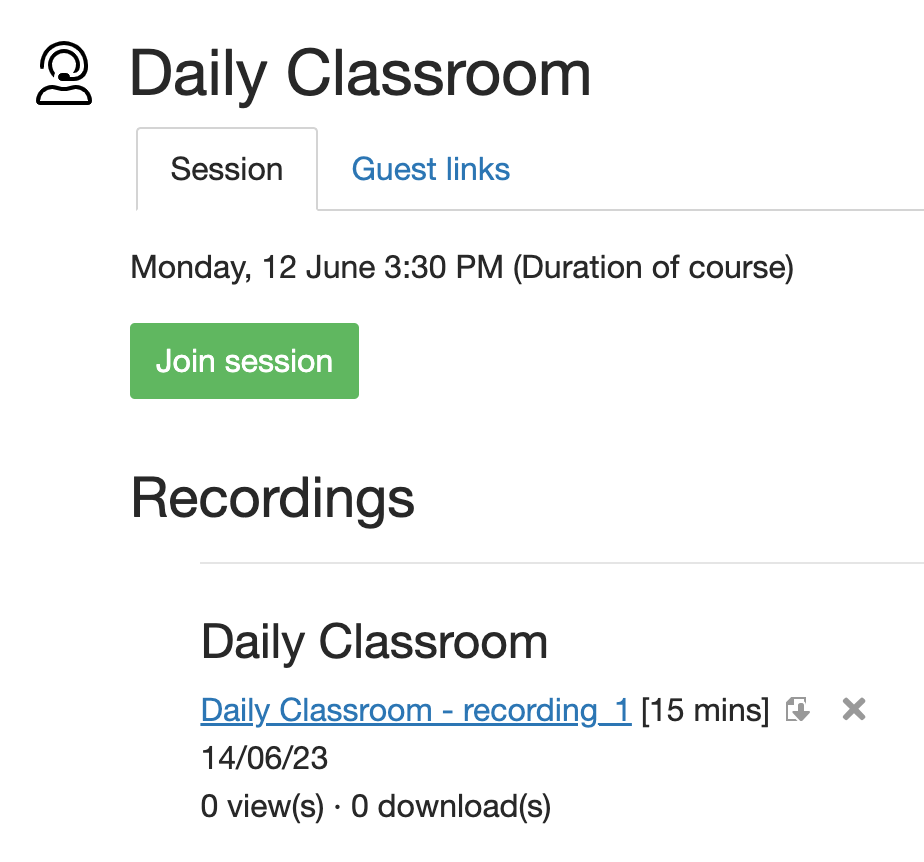
If you have a regular Collaborate session that runs for the duration of your course, recordings will be numbered, dated and added to the list below the Collaborate session. The recording can also be downloaded.
Working with groups
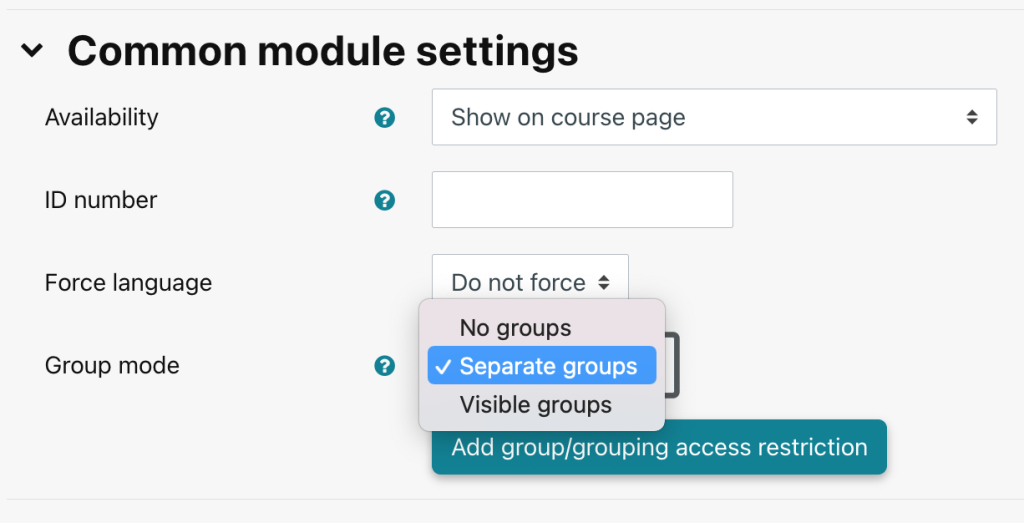
Collaborate can be used to create a tutorial rooms for groups of students within a course. Collaborate will use the group function in Moodle to send students to a specific Collaborate session for their group. This is useful for large courses with multiple tutor groups.
- First, you’ll need to ensure that your Moodle course has defined groups. Groups can be set up in the Moodle course settings. For more detailed guidance visit our guide Setting up Groups in Moodle (add link).
- To begin, add a new Collaborate Ultra activity to your Moodle course page.
- Set the Start and Duration of the Collaborate activity
- Scroll to Common module settings, in the Group mode dropdown select Separate groups
- Scroll to the bottom of the page and click Save and display
