Explore quick methods to make your Panopto uploads more accessible for students. Scroll through this page to browse the tips, or use the link below to jump directly to a specific one.
Learn how to:
- Use clear titles and descriptions for better understanding
- Edit captions for accuracy
- Improve navigation with chapters
- Use descriptive language to link to further resources
Use clear titles and descriptions for better understanding
Vague or unclear video titles and descriptions can make it hard for students to identify content, particularly for those with visual impairments, cognitive processing challenges, or who rely on screen readers.
Without clear labels and summaries, students may struggle to determine if a video is relevant or if it contains necessary information for their learning needs.
How to insert titles and descriptions:
- After uploading your video, click ‘settings’ and find the “Title” field.
- Create a descriptive title that summarises the topic.
- Use the “Description” field to write a short summary of key points.
- If applicable, mention any accessibility features like captions or downloadable resources.
Edit captions for accuracy
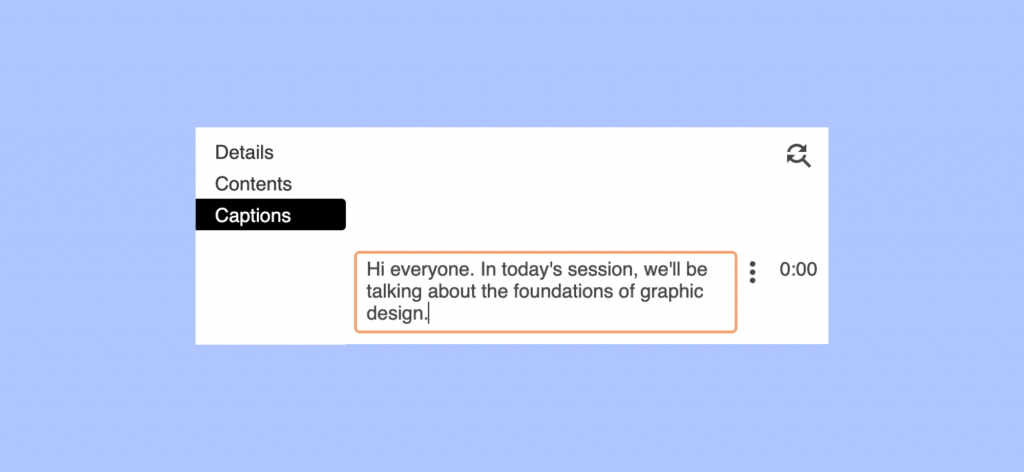
Automatic captions generated by Panopto may contain errors that can lead to misunderstandings, especially for students who rely on captions.
Missing or incorrect captions and transcripts can significantly reduce the accessibility of the content, making it harder for students to follow along.
How to edit captions:
- After the video is processed, click ‘edit’ then ‘captions’
- Review material to identify and edit any errors.
- If you have a transcript of the video, upload it alongside the captions to provide an alternative way for learners to access the content.
Improve navigation with chapters
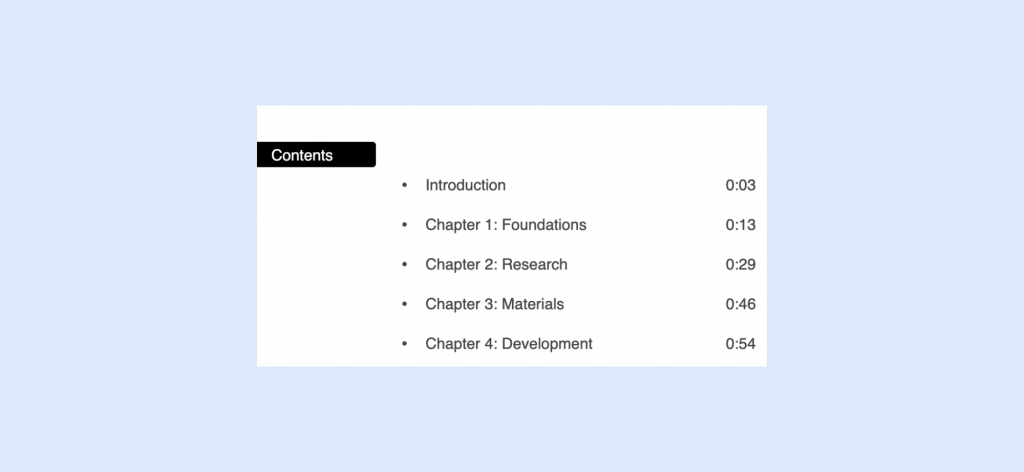
When videos don’t have clear chapters or sections, it can be hard for students to find what they need, especially if they’re short on time, find it difficult to focus, or need help processing lots of information at once.
Break your video into chapters to make it easier for students to jump to the section they need.
How to add chapters:
- After uploading your video, click “Edit” then ‘Contents’
- Identify the different sections in your video, e.g; topic changes, key pieces of information etc
- Choose a timestamp and write a title for that section in the box that says ‘enter a table of contents entry’
- Select ‘Apply’ and review to ensure the chapters accurately reflect the flow and content of the video
Use descriptive language to link to further resources
When you include additional resources in your videos, write clear and descriptive instructions using inclusive language to help all students, especially those using screen readers or assistive technology, easily locate and identify the information. Add these descriptions both in your spoken content and in the video description.
Whenever you mention links or resources, describe them by name-for example, say “see the full guide on design foundations below” so students know exactly what to look for.
Further Learning
Learn about the accessibility features in Panopto (web page)
Read more on creating accessible learning experiences in Panopto (web page)