In this guide:
- About Panopto
- Step 1: Provisioning and installing
- Step 2: Recording and uploading
- Step 3: Editing
- Step 4: Sharing
- Step 5: Managing
About Panopto
Panopto is a UAL supported digital learning platform you can use to record live teaching sessions and create educational videos to support learning activities such as tutorials, demonstrations, briefings and feedback. It is also a content management system for managing and sharing audio-visual content with your course teams and students.
This step-by-step guide introduces you to the main features of Panopto: recording editing, sharing and managing videos. Panopto have created a series of short videos to help you get started and we’ll be referring to those throughout.
Step 1: Provisioning and installing
Provision a course
Panopto works through its integration with Moodle. Before you can use Panopto, you must first provision (enable) it on the Moodle courses you are enrolled on as a member of staff with editing rights. Review our step-by-step guide on how to provision (enable) Panopto in a Moodle course
Please note: each Moodle course only needs to be provisioned once by one user who has editing rights, usually any member of staff.
Log in to Panopto
Go to Panopto. You will be prompted to sign in via Moodle before being redirected to the Panopto website.
From the Panopto website you can record a combination of voice, camera and screen using the online ‘Panopto Capture’ tool, upload, edit, share and manage video content. There is also a more comprehensive desktop recording application available for Mac and PC which can record a combination of voice, computer audio, multiple cameras and screens, and PowerPoint or Keynote presentations. The desktop version will also generate a table of contents from the titles of your presentation slides to help students navigate the recording.
Download Panopto (optional)
You can download and install the desktop version on UAL devices through Self-Service (Mac) or Zenworks (PC). If you cannot find the Panopto software in Self Service or Zenworks, contact IT by submitting a ticket on MySupport.
Mac users will need Mac OS High Sierra (10.13) or higher. If you are using a UAL device, you can request an upgrade through IT by submitting a ticket on MySupport.
If you are not using a UAL device, follow Panopto’s installation guidance:
Step 2: Recording and uploading
Record in Panopto
Panopto allows you to record a combination of sources such as your camera, screen and slide presentation. Watch these videos for a quick tutorial on how to record and upload your first video:
Upload existing content
You can upload existing audio-visual content to Panopto. Learn how to upload media files in this Panopto video.
We recommend uploading your recordings and pre-existing content to your Panopto My Folder. This is your own personal and private folder. You can edit content before sharing more widely (covered in step 4).
Accessibility
Educational videos should be accessible to all learners. Keep these points in mind as you plan your video content:
- Use inclusive language in your script. For example, instead of “you will see a button appear” use “a button appears”.
- Use high contrast graphics and text for maximum visibility.
- Omit sequences that may result in the rapid flashing of images.
- Use diverse imagery: be representative of your students, not a clipart library.
Step 3: Editing
Panopto’s editing functionality is non-destructive. This means you can’t permanently delete sections of your recordings, but you can hide them when the video is played back. In addition to trimming out unwanted sections you can edit different videos together, add title and end cards and create a table of contents.
Automatic captions
You can also generate automatic captions which you should do for all videos you create. Although auto-captions are mostly accurate there may be some incorrections. The captions are easy to edit and we recommend reviewing them prior to sharing the video.
If you’re unable to edit the automatic captions then you should include this disclaimer in an appropriate place (such as a Moodle page or a block):
Captions Disclaimer: The captions for this video are computer generated and as such there may be some incorrect words. If you have any questions about the content in this video, please speak to your course or unit leader.
Watch these Panopto how-to videos:
- How to Trim a video
- How to splice multiple sessions together
- How to add and edit slides
- How to add a table of contents
- How to add and edit captions
Step 4: Sharing
After you have uploaded a video to My Folder and completed any editing, you may be ready to share videos with users on a provisioned Moodle course.
You will need to copy or move the video to the relevant Moodle course folder. Watch this video on copying and moving videos.
Once the video is moved, it will be available to all enrolled users, but only via the Panopto block on the course home page.
For a better user experience, create a link to the video in the appropriate section of the Moodle course. Linking can be done in two ways.
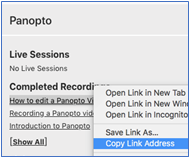
- (Recommended) You can add a web link to a Moodle section or page. Select the video from the Panopto block and copy the link. The most recent video appears at the top of the Completed Recording list:
- You may choose to embed a video directly into a Moodle course. Please note that with embedded videos, some browsers may prompt the user to enter their UAL username and password before the video appears. In some cases, access to embedded videos may be blocked entirely.
Watch these Panopto how-to videos:
Step 5: Managing
You can create folders and subfolders to organise and manage the video content that sits across your My Folder, and the Moodle course folders you have access to.
By default, subfolders inherit the same access permissions as the parent folder. Watch this video on creating folders and subfolders